
Connecting
Connect the MCS Access Series power supply and connect the appliance to the LAN using an RJ45 cable. The LAN must support DHCP services.
Using a PC workstation connected to the same LAN as the Access Series device, locate the configuration utility in the Access Series Embedded MCS kit, which can be downloaded here. Once installed, run the eMCS configuration program AccessCfg.exe in the Access Series Upgrade folder.
Configuration Utility
The eMCS configuration utility dialog will appear as shown below.
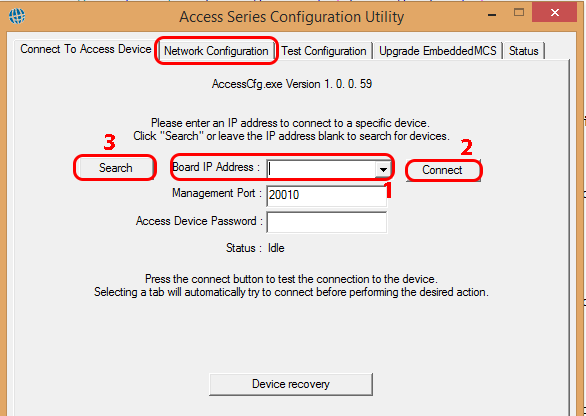
If the MCS Access Series IP address is known, type it into the "board IP address" field (Fig 1, item 1). Alternatively, click the search button to locate the IP automatically.
Once the device has been located, click the
Click the
Note: If there is more than one MCS Access Series device on the local network, clicking the search button will locate all devices — use the drop-down list to select the required device.
To connect to a device on a different subnet, type the IP address and click connect. UDP port 20010 must be open and available.
Network Configuration
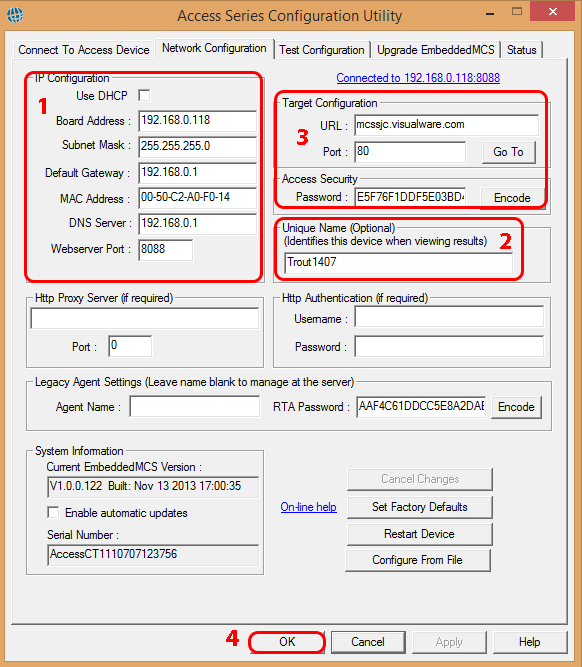
DHCP (1)
To use a static IP instead of DHCP, uncheck
| Field | Description | Default |
|---|---|---|
| Board Address | IP address for the local network. | 192.168.0.98 |
| Subnet Mask | Subnet mask for the local network. | 255.255.255.0 |
| Default Gateway | Local network gateway IP for Internet/WAN access. | — |
Unique Name (2)
Set the unique name to identify the MCS Access Series device when multiple appliances are active on the network. The Agent and Unique names are used on MyConnection Server to manage the work order for the device.
Note: If the agent name field is not blank, the MCS Access Series appliance will not be registered for management by MyConnection Server.
Server IP Address (3)
Set the server IP address and port number to match the MyConnection Server that will manage the Access Series license and work order assignment.
Note: A password can be added to prevent access from unauthorized users.
Complete (4)
The MCS Access Series connection and configuration is now complete. The next step is to define and allocate a work order.
Create a Satellite Work Order (SWO)
SWOs contain one or more tests that can be assigned to any Access Device. Once assigned, the device will perform the work order.
Permit then Assign
At this stage the Access Device should be connected to MCS and at least one SWO should exist.
First, permit the Access Device in MCS.
Second, assign the SWO.
View Results
Once the Access Device is running a work order, results will begin to accumulate in the database.