

Overview
With the use of the Visualware Publication Satellite (PubSat), reports can be published directly to a web server from MCS. Whether it's an end-of-month report for private use or a weekly review for a customer, it can all be done from this page.
The sections below walk through each part of the Publish a Report page in MCS.
Choose a report & define tildes
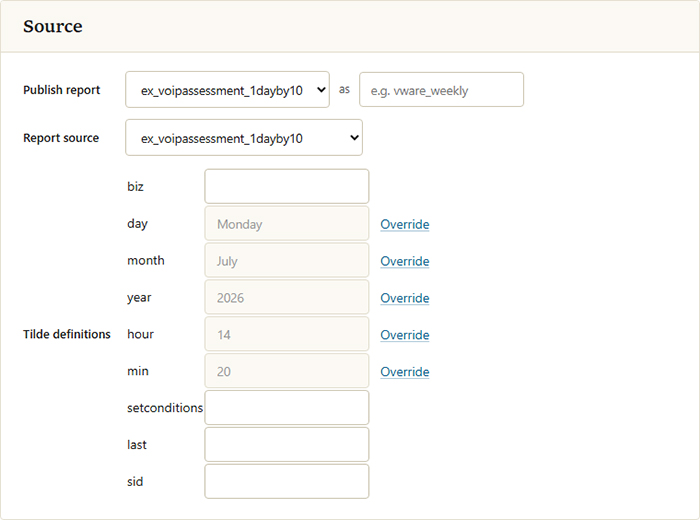
This panel is where you pick the report to publish, give the published file a name, and supply any values the report needs. Each part is described below and shown in the image above.
Choose the report
The
The endofmonth publishes the file as endofmonth.html.
Choose a source file
A source file (extension .ppf) defines the data-driven elements of a report. In most cases each report has its own matching source file. The only exception is when the data and widget definitions are written directly into the report's HTML.
Define tildes
Source and HTML files can contain tilde substitutions: placeholders that are swapped for real text when the report is published. If the report or source file you selected contains any tildes, a tilde values section appears beneath the report options, as shown in the image above.
Enter a value for each tilde in the text box beside it. That value is used in place of the tilde wherever it appears in the report.
Some tildes have a global default value, such as year and month in the image above. To use a different value for this publication only, click the
Note: Overriding a tilde applies only to the publication you are creating. It does not change the tilde's global value.
Destination
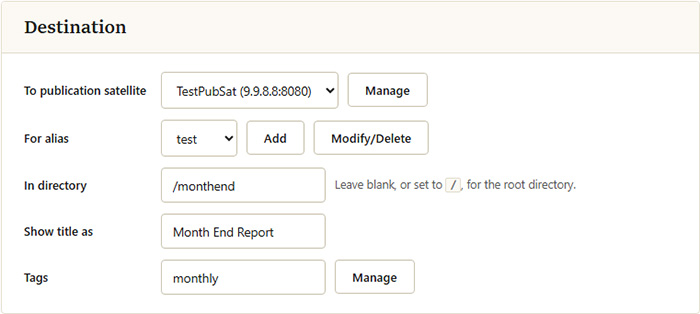
The Destination settings control where the report is published and how it is listed on the report portal. Choose the publication target, then the alias and directory to publish into, and finally the title and tags used to find the report later.
Publication Satellite
The default publication method is
A PubSat is a small program that sits on a web server, allowing reports to be sent from MCS directly to that server. This is a licensed extra. Please contact sales for more information.
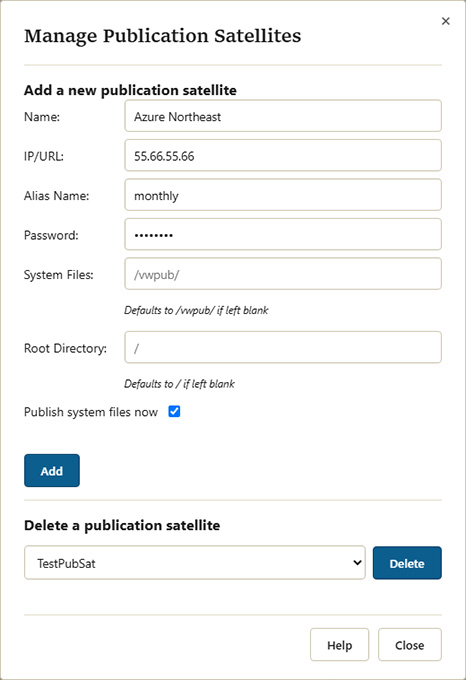
Once the PubSat is installed on the web server, it must be added to MCS. Click the
Adding a PubSat
Adding a PubSat requires the following information:
| Field | Description |
|---|---|
| Name | The name used within MCS to reference this PubSat. |
| IP/URL | The IP or domain the PubSat is listening on. Include the port number if it differs from 80 (e.g., 1.2.3.4:7980). |
| Alias Name | Set during PubSat installation. An alias refers to a directory within the web server hierarchy. Multiple aliases can be set per PubSat for publishing to multiple sites. |
| Password | Each alias has a password to prevent unauthorized publications. Must match the value set in pubsat.ini. |
| System Files | Required for reports to load. The directory must be created at the remote end. Default: /vwpub/. |
| Root Directory | The alias root directory on the server. If an alias child directory should be treated as root, define it here. |
| Publish Files Now | Uncheck if the system file directory hasn't been created yet. System files can be published at any time by managing an existing alias. |
Deleting a PubSat
Select the PubSat name from the drop-down menu. When a PubSat is deleted, all associated aliases are also deleted.
The checkbox determines whether associated reports in the publication queue will also be removed. If they aren't deleted, they will need to be updated with a valid PubSat for publication to succeed.
Alias
Once a PubSat has been added, the alias created with it is selected by default. A PubSat can have multiple aliases, letting it publish to more than one site. Two buttons next to the alias drop-down manage them:
Adding an Alias
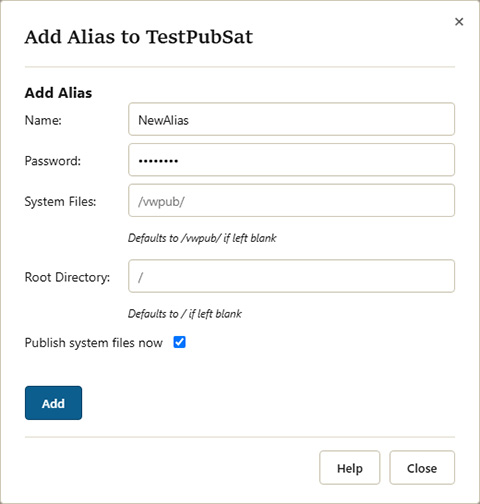
Click
| Field | Description |
|---|---|
| Name | Refers to a directory within the web server hierarchy. Multiple aliases per PubSat allow publishing to multiple sites. |
| Password | Must match the value set in pubsat.ini for this alias. |
| System Files | Directory for system files. Must exist at the remote end. Default: /vwpub/. |
| Root Directory | If an alias child directory should be treated as root, define it here. |
| Publish Files Now | Uncheck if the system file directory hasn't been created yet. |
Modifying or Deleting an Alias
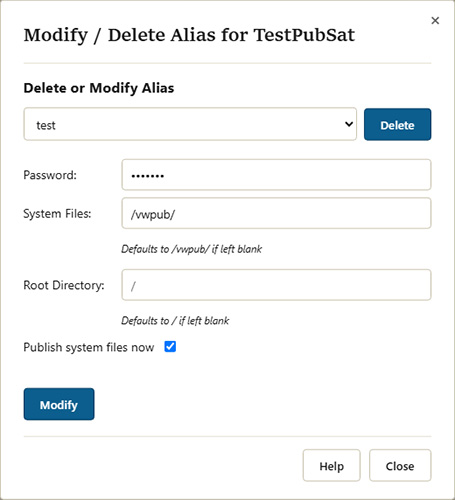
Select an alias from the drop-down and click
- Modify: update the alias settings, such as the password or root directory. You can also publish its system files by checking the publish system files box and clicking
Update Alias . - Delete: remove the alias. If it is the only alias left, delete the PubSat itself instead, as a PubSat must always have at least one configured alias.
Note: If reports exist in the publication queue that use the alias being deleted, they must be updated to use a valid alias or they will not publish.
Directory
Specify the directory to publish the report. This directory begins from the root defined by the alias. For example: /support/reports/
Report Title
The title set here is used when viewing the report from the master report portal page, where all reports are listed and filtered. This is not the title that appears on the actual report. That title is defined directly in the report HTML.
Tags
Tags are used to filter reports on the master portal page. If hundreds of reports have been published, tags help quickly narrow down the required report. At least one tag is required.
Use a comma to specify more than one tag. Use hyphens for multi-word tags.
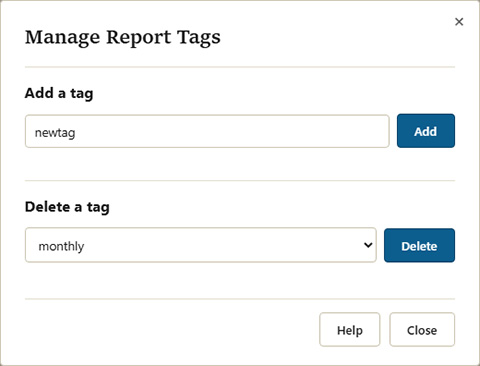
Adding tags to the MCS database enables auto-complete when specifying tags for future reports. A comma-delimited string can be used to add multiple tags at once. To delete a tag, select it from the drop-down and click
Advanced
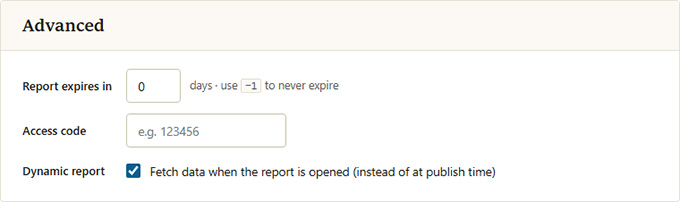
The Advanced settings give you extra control over how long a report stays available, who can view it, and how its data is refreshed.
Report expires in
Set the number of days a published report should stay available. Once that period passes, MCS removes the report during its daily housekeeping routine.
Access code
Assign an access code to hide a report from the publication portal. A protected report stays hidden until the exact access code is entered.
Dynamic
A dynamic report fetches its data each time it loads, so it always shows the latest information. This suits dashboard-style reports that need to reflect the most recent data. Uncheck the box to make the report static instead: its data is fetched and stored when the report is first published, so the report shows the same snapshot every time it is accessed.
When To Publish
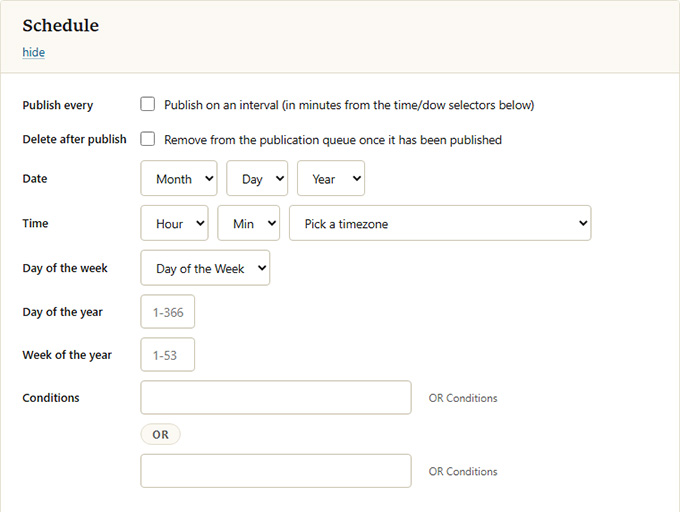
Control when a report publishes by setting a date, by defining calendar events, or by combining both.
Publish date
Choose the date the report should publish. Wildcards let a report publish periodically. For example, choosing Jan 1st but entering **** for the year publishes the report every year on Jan 1st.
Calendar events
Calendar events can also drive publishing by matching date-associated keywords defined in MCS. For example, a variable named ENDOFMONTH with a date of ** (month) 28 (day) **** (year) becomes active on the 28th of every month.
There are two inputs, each treated as a truth-set. A report is eligible to publish when either every variable in the first input is true, or every variable in the second input is true.